ViralSpin Academy
Related Reading
Pick a CC0 model, not just any free one. 'Free to download' on Sketchfab usually means CC-BY — which legally requires visible attribution on every page that uses it. CC0 has no such string attached. Filter for it up front and you never have to think about credits again.
Build a 3D Laptop Hero
With Claude Code
 AITechDad
•
Updated August 2026
AITechDad
•
Updated August 2026
A flat hero image says "we made a website."
A real-time 3D device that flies in, opens, and runs your actual product says "we ship."
Here's exactly how we built ours — and how you can, with Claude Code.
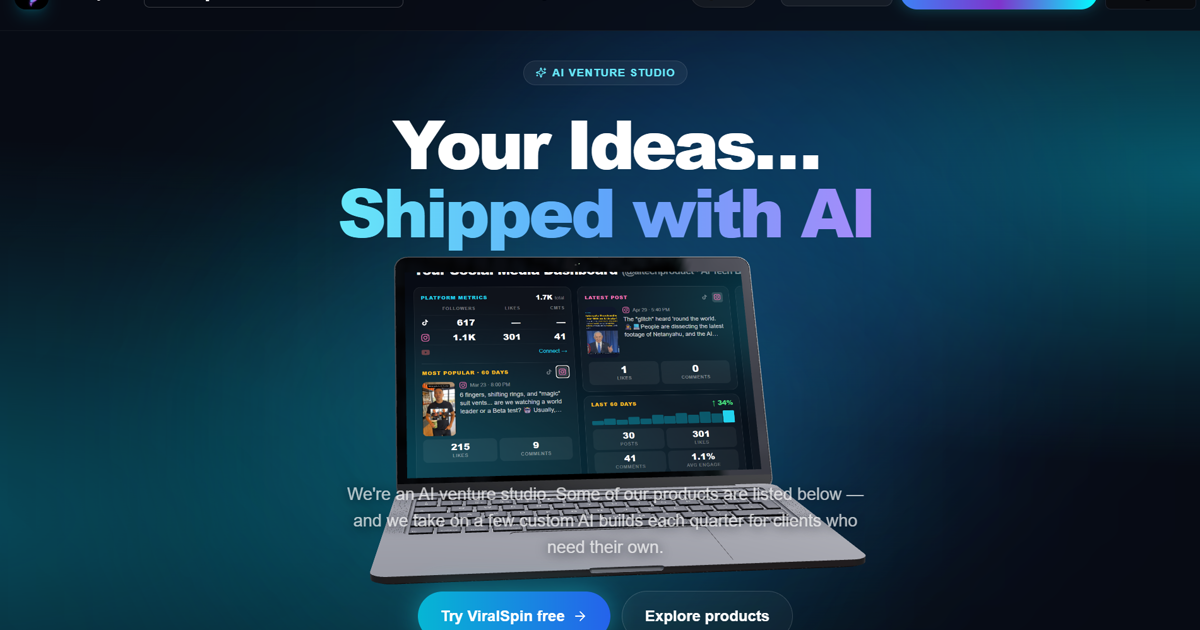
Open the ViralSpin homepage and a MacBook glides in from off-screen, turning as it comes, its lid opening mid-flight. On the screen: our actual product — scrolling through real captures and clips — before the laptop turns to face you and the lid clicks shut, handing off to the rest of the page. No video file. No pre-rendered animation. It's a live 3D scene running in the browser.
We built the whole thing with Claude Code — the coding agent, writing real React and WebGL — not a no-code tool and not our MCP connector (more on that at the end). This guide is the honest, reproducible version: the stack, the code, and the four or five gotchas that ate the most time so they don't eat yours.
The stack
This is deliberately boring, battle-tested tooling. The magic is in how the pieces fit, not in any one exotic library.
| Layer | What we used | Why |
|---|---|---|
| Renderer | React Three Fiber (@react-three/fiber) |
Three.js as declarative React components |
| Helpers | drei (@react-three/drei) |
useGLTF, useAnimations, Bounds, Environment |
| Engine | three | The actual WebGL under R3F |
| Motion | Framer Motion | The fly-in glide and scroll hand-off |
| Model | A CC0 laptop GLB | Rigged, with a lid hinge animation |
| Build / host | Vite + Vercel | Code-split build, push-to-deploy |
npm install three @types/three @react-three/fiber @react-three/drei framer-motion
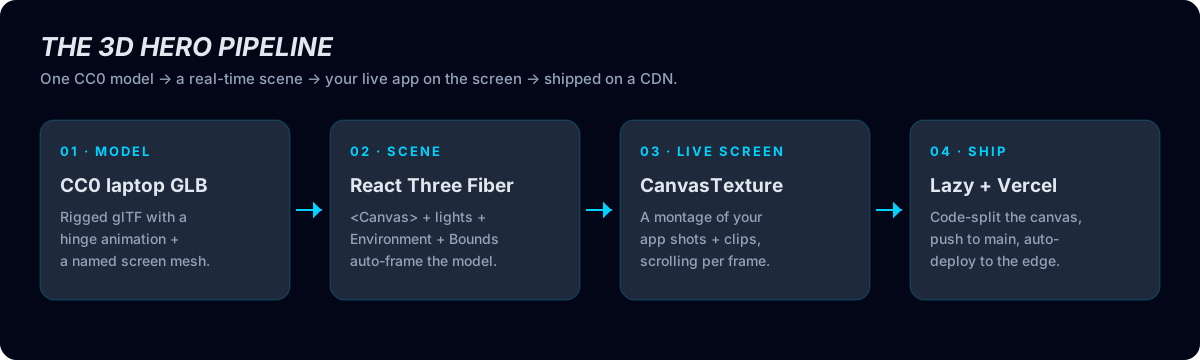
The mental model is a four-stage pipeline: a rigged model, a scene that frames it, a live texture that turns the screen into your real product, and a shipping step that keeps it fast.
Step 1 — Get a rigged CC0 laptop
Search Sketchfab for a laptop or MacBook model and filter to "Downloadable" + license "CC0". CC0 means public domain — no attribution string attached. Plenty of "free" models are actually CC-BY, which legally requires a visible credit on every page that uses them; CC0 saves you that whole headache. Download the glTF / GLB variant.
You want three things in the model:
- A rigged lid hinge — a built-in animation that opens the lid.
- A named screen mesh or material — so you can find the display and swap what's on it.
- Clean, sensible materials (Apple-grey aluminium reads well under studio lighting).
Drop the file into public/ and preload it so the browser starts fetching immediately:
import { useGLTF } from "@react-three/drei";
useGLTF.preload("/hero/laptop.glb");
A quick way to inspect what's inside a GLB — mesh names, material names, animation tracks — is to run it through gltfjsx, or just open it in the three.js editor. You're looking for the name of the mesh that is the screen surface. Ours was the quad carrying the model's "wallpaper" texture.
Step 2 — Render it with React Three Fiber
R3F turns three.js into JSX. A <Canvas> is your scene; everything inside is the world. Bounds auto-frames the model so you don't hand-tune the camera, and Environment gives you free image-based lighting that makes aluminium look like aluminium.
import { Canvas } from "@react-three/fiber";
import { useGLTF, Environment, Bounds } from "@react-three/drei";

function Model() {
  const { scene } = useGLTF("/hero/laptop.glb");
  return <primitive object={scene} />;
}

export default function Laptop3D() {
  return (
    <Canvas camera={{ position: [0, 0.6, 5.5], fov: 32, near: 1, far: 50 }}
            gl={{ alpha: true, antialias: true }} dpr={[1, 2]}>
      <ambientLight intensity={0.6} />
      <directionalLight position={[4, 8, 6]} intensity={1.4} />
      <Environment preset="city" />
      <Bounds fit clip margin={1.05}>
        <Model />
      </Bounds>
    </Canvas>
  );
}
One detail that matters more than it looks: the camera's near/far planes. The default 0.1 / 1000 spreads depth precision so thinly that on mobile GPUs (which often have a lower-precision depth buffer) coplanar surfaces — like a screen and the glass panel sitting right on top of it — start z-fighting, flickering into blocky black squares. Our laptop sits about 5 units from the camera, so near: 1, far: 50 is plenty and fixes the artifact for free. Hold that thought; it comes back in Step 3.
Step 3 — Put your actual product on the screen
This is the part that turns a nice 3D model into your hero. Instead of baking a static screenshot into the texture, we render a live, scrolling montage of real product captures and short clips onto the screen mesh every frame.
The trick is a CanvasTexture: a normal 2D <canvas> that we redraw each frame and hand to three.js as a texture. First, find the screen material and replace it:
const tex = useScreenMontage(); // builds a CanvasTexture (below)

scene.traverse((o) => {
  const m = o as THREE.Mesh;
  if (m.isMesh && (m.material as THREE.Material)?.name === "ScreenMaterial") {
    const mat = new THREE.MeshBasicMaterial({ map: tex, toneMapped: false });
    // win the depth test against the coplanar glass layer
    mat.polygonOffset = true;
    mat.polygonOffsetFactor = -2;
    mat.polygonOffsetUnits = -2;
    m.material = mat;
  }
});
MeshBasicMaterial (not a lit material) keeps the screen looking emissive — like a display that's on, not a surface waiting for light. The polygonOffset lines are the second half of the z-fighting fix from Step 2: they nudge the screen a hair toward the camera so it reliably draws in front of the model's glass.
Then drive the montage from R3F's render loop. Each frame we clear the canvas, draw the current image (or video frame), scroll it, and flag the texture for re-upload:
useFrame((state) => {
  const ctx = canvas.getContext("2d")!;
  const item = MEDIA[idx];               // { src, video?, dur? }
  // ...advance idx when the current item's dur elapses...
  ctx.fillStyle = "#0b1120";
  ctx.fillRect(0, 0, canvas.width, canvas.height);

  // fill the full width, scroll the vertical overflow
  const scale = canvas.width / el.naturalWidth;
  const dh = el.naturalHeight * scale;
  const prog = (state.clock.elapsedTime - start) / item.dur;
  ctx.drawImage(el, 0, -prog * Math.max(0, dh - canvas.height),
                canvas.width, dh);

  texture.needsUpdate = true;            // re-upload to the GPU this frame
});
Videos go in the same array — create a muted, looping, playsInline <video> element, call .play(), and drawImage accepts it exactly like an image. We even trimmed one source clip to just its best three seconds with ffmpeg so the montage never drags.
Three gotchas burned real time here:
- The texture renders upside down. glTF screen UVs and a 2D canvas disagree on which way is up. Set
texture.flipY = trueand it flips back. - Source clips have dark dead-space. One editor recording had a dark panel down its right edge. Rather than letterbox it, we zoom in slightly and left-anchor the draw so the dead-space pushes off-canvas and the content fills the screen.
- Mipmaps on a per-frame, non-power-of-two canvas glitch on mobile. We tried enabling them to fix minification aliasing and got worse artifacts. The real fix was the camera
near/far+polygonOffsetz-fight fix above; keep the texture on plainLinearFilter, no mipmaps.
Step 4 — Choreograph the entrance
Three things happen at once as the laptop arrives, and they're driven off a single clock.
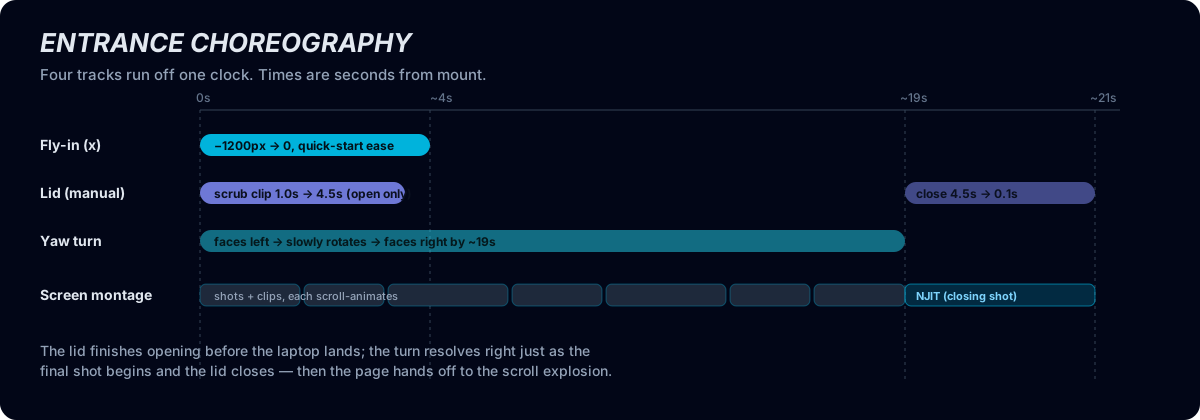
The glide-in is plain Framer Motion on the wrapper div — translate from far off-screen to home. A symmetric ease-in-out lingers before it moves, which reads as lag, so we use a quick-start ease instead:
<motion.div
  initial={{ opacity: 0, x: -1200 }}
  animate={{ opacity: 1, x: 0 }}
  transition={{ duration: 4.0, ease: [0.22, 0.7, 0.3, 1] }}>
  <Laptop3D />
</motion.div>
The lid is the sneaky one. Our model's built-in animation opens the lid over the first ~4.5 seconds — and then closes it again over the rest of the clip. Playing it straight, or seeding it halfway, lands you in the closing half with a shut laptop. So we don't "play" it at all; we scrub it manually, mapping our own progress onto just the opening portion of the clip, then hold it open:
action.play();
action.paused = true;          // we drive time by hand
// each frame, while entering:
action.time = THREE.MathUtils.lerp(1.0, 4.5, openProgress);
At the very end of the montage we run that scrub in reverse to close the lid as the final shot plays. The yaw turn is a slow lerp of the model's rotation spread across the entire montage, so it starts facing left (it's flying in from the left) and resolves facing right exactly as the lid shuts. Small touches, but together they're the difference between "a model spun on screen" and "a device performed for me."
Step 5 — Ship it without tanking your load time
Three.js is heavy. The fix is to lazy-load the whole canvas so it's a separate chunk that never blocks first paint:
const Laptop3D = lazy(() => import("./Laptop3D"));
// ...
<Suspense fallback={null}><Laptop3D /></Suspense>
Two more production manners. First, the rest of the homepage — the scroll-driven content that follows — stays hidden until the laptop intro is done, so visitors don't see the next section bleeding through behind a flying laptop. We gate it on a timer that matches the choreography. Second, mobile gets its own tuning: the laptop sits higher (there's headroom above the headline), and the hand-off timing shifts so the intro reads well on a tall, narrow screen.
Then it's just git push. Vite produces the code-split build and Vercel auto-deploys on push to main. Total marginal bandwidth for the effect: one GLB (a few MB, cached after first load) plus your screenshots and trimmed clips.
"Could I just do this with an MCP connector?"
Worth answering directly, because people ask. No — and that's not a knock on connectors, it's a category difference. An MCP connector (like ViralSpin's own publishing connector) gives an AI assistant a set of tools: generate a caption, schedule a post, list your connected accounts. Those are great for operating a product from inside a chat.
This hero is authored software — React components, a render loop, GLSL-adjacent texture work. You build it the way we did: with Claude Code, the agent that reads and writes the actual files in your repo, runs your build, and iterates with you on the result. The connector publishes the video you made; Claude Code helps you make the thing. Different jobs, different tools.
The takeaway
A real-time 3D hero is no longer a specialist, weeks-long effort. The libraries are mature, the model is a free download, and an agent like Claude Code can move you from "blank file" to "shipped" in an afternoon — including the unglamorous debugging (upside-down textures, z-fighting, an animation that closes when you wanted it open) that's exactly where having a coding agent in the loop pays off.
See it live, in motion, at viralspin.ai — then go build your own.